This fifth article in the series looks at the split-level felling cut in a bit more detail, including its range of application. Remember, this written article is no substitute for the personal delivery of tree felling skills and should be seen as supporting that primary personal delivery. In short, this is a complicated cut to lean; most students are confused by it even after several repetitions, felling simulator practice and whiteboard diagrams.
Having said that, once mastered, it can transform how you approach tree felling work, allowing the placement of trees to suit processing, extraction and conversion requirements. Sadly, however, not many know about it or due to skill fade if they did soon forget the key points.
As previously discussed, this cut is ideally suited to trees with a modest backward lean or with a biased canopy where the use of a standard felling cut would more than likely result in the kerf closing and trapping the chain saw guide bar. In a nutshell, this cut splits the felling cut into two allowing pre-emptive use of the felling lever to support the compression as the second cut is completed. The different levels reduce the risk of hitting the felling lever.
This is generally where we leave the discussion on the early part of our small tree felling courses. However, it's a versatile cut and can be deployed where there is a side lean, and indeed for upright trees where say, a headwind makes things unpredictable. It does even work on a tree with a slight forward lean. A split level can be a solution to trees just over guide bar diameter or shorter guide bars that we see on felling courses. Of course, all of this is subject to detailed tree, species and site assessment beyond this article's scope or any written description of a practical skill.
Because of the two-part construction of the back felling cuts, there are options about where to finish (left or right side of the tree). This can help advance students develop their understanding and options in the context of specific site hazards or terrain. It also leads naturally to felling larger trees as the saw from either side of the tree is required.
As on all felling, prepare the tree and immediate area for felling, via brashing, removing or cutting material in the way and thinking about the intended route of the tree - remove any smaller material likely to deflect or cause low-level hang-ups.
A felling lever is required for this cut, so have this available in a handy spot where you’re not going to trip over or have to cross a dangerous area to get hold of it. Choose a lever suited to the likely felling force, but beware of miss-matched chainsaw pitch and felling lever thickness - it should be a neat fit. Applied felling force is a function of the following factors that will have a more detailed look at a future article on assisted felling techniques.
- Operator applied force
- Lever length
- Hinge position
- Tree diameter and distance from lever fulcrum
- Tree bearing capacity – compression and splitting
- De-buttress the tree if there are no signs of decay or clean the sides if improved visual clarity is required. This is of particular value on the split level where cuts from either side are made.
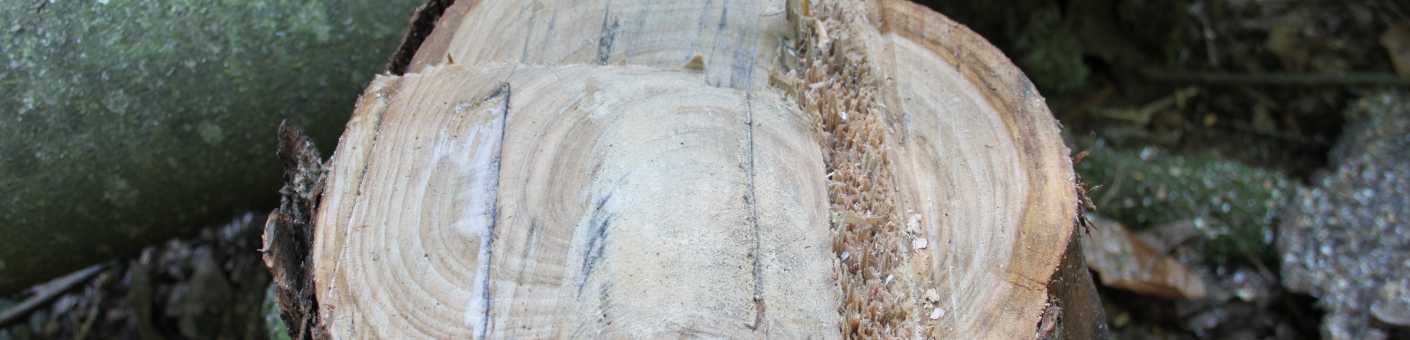
- The directional sink is formed with two cuts that meet, it has an open or angled face around 55-60 degrees and a flat base, ideally, the sink extends to 20-25% of the tree diameter. It is formed at 90 degrees to the felling direction. Don’t overcut and remember to use the saws felling sights for directional accuracy.
- Deploy accuracy aids as required such as straight sticks or mark the clean-cut side surface with hinge dimensions.
- Make a two thirds (66%) back cut either using a pushing chain on a smaller diameter tree or a bore technique according to preference and compatibility of saw, chain & operator bore control skill. Generally, this is easier from the right-hand side looking in the direction of felling.
- Insert the felling lever, make sure it is fully inserted and on softer bark clean that away to aid lever placement. Leave a gap to the left so the lever is not positioned on the limit of this partial cut.
- From the other side (left in this case) adopt a stance that allows the saw to be used parallel to the sink to form a suitable hinge. Make a second felling cut (roughly one third) in the remaining fibres that will be in compression. This should be at a shallow angle to project under and overlap the first cut by around 25mm in both directions. On the nearside, the highest point of the guide bar to cut the tree edge should match the height of the first two-thirds cut.
- Remember to stop cutting at the point where the hinge is formed. Turn off the saw, place it safely to the side and step behind the tree to lift the lever with good posture. Be careful to avoid overstraining the body. If the tree moves then rebounds don’t fight this, wait until it is still and try again.
- When the tree starts to fall of its own accord retreat promptly using the escape route, if you can bring the lever if it’s stuck then escape without. This teaches an important principle about the value of kit versus personal injury.
At a Lantra Awards update a few years ago, I heard an instructor describe the six ways to construct a split level. It made me laugh and wonder at how differently people look at things but has stayed with me as a fun way to make the point that you can switch the sides of the two thirds/one-third cuts in response to the tree morphology, site safety considerations such as terrain or obstructions or best escape routes. As for the other four ways, can you work out what they are?
As previously stated, this cut can take a while to master, and in the learning process, a few errors regularly crop up and are worth noting.
Chain rotation pulls the saw towards the kickback zone on the upper portion of the guide bar nose; this can easily wipe out the central hinge or more and result in a crushed guide bar and trapped saw. Guard against this force and maintain spatial awareness of the guide bar in relation to the hinge - practice in a non-critical felling simulator.
The felling cut overlap can be excessive; often, the angled cut projects too far. This means the felling lever is compressed on a step-cut section of a tree stem, which can fail to allow further backward tree movement or allow the felling lever to break a section and rotate out of the kerf.
On the other hand, felling overlap can be insufficient. Due to the curved bar nose profile, this zone might be tiny but will require significant force to break, meaning extra effort on the felling lever. If the area of un-cut fibre is more extensive, then no amount of levering will move the tree, and the angled cut will need to be enlarged. Watch out for kickback and hinge damage. Because of the felling lever placement, the first cut generally can’t be modified or can only be changed at risk of hitting the steel lever.
The felling lever must be fully inserted. Otherwise, edge fibres can fail, and the lever bends or breaks a section below to the rear and the tree suits back against the intended felling direction.

